With modern tools, there are countless different ways to implement a webapp. But at the core, all of them share the same high-level concepts.
- The frontend waits for user input and sends the request to a backend API.
- The backend receives the request on its API and processes the request. If necessary, it queries the database to read or update data.
- The database receives a query from the backend. It fetches or updates its data and returns it back to the backend.
- The backend receives the returned data from the database. It constructs a response and returns it back to the frontend.
- The frontend receives the returned data from the backend. It parses the data and displays it to the user.
Processing and storing data
There are a number of ways to process data. Fundamentally, they all fall into CRUD[Wikipedia]:
- Create
- Read
- Update
- Delete
For a more visual (very brief) crash course into CRUD, see:
[YouTube] CRUD Operations are Everywhere: DB and REST API Examples – Alex Hyett
In the case of a web application, CRUD requests are typically performed through a RESTful API[Wikipedia] on the backend. Note that the above linked Wikipedia page is more of a loose mapping. Developers often do not strictly implement CRUD through the entire suite of POST, GET, PUT, PATCH, and DELETE. Don’t feel the need to use all of them. Only implement what you need to make your application function.
Here is a basic tutorial on creating a RESTful webapp including a basic frontend, backend, and database. By working through a simple example with all the moving parts, you can better understand the concepts.
[Medium] How to Create a Basic CRUD API using Python Flask – Hillary Wando
Feel free to skip the last section about Docker. It’s less important to learning web development concepts.
I recommend downloading Postman to easily test sending HTTP requests to your API.
While the above example may not be directly relevant towards using Firebase, it will flesh out useful development concepts for understanding what Firebase is doing.
The rest of the article will assume you’re familiar with the above code example.
Security practices
Before we go further, let’s establish the difference between authentication and authorization:
- Authentication: You are who you say you are.
- Real world: Driver’s license or other form of ID.
- Web: Log in with username and password.
- Authorization: You are allowed to perform this action.
- Real world: The bartender gives me a drink because my ID shows that I am over 21.
- Web: As part of the
admingroup, I am allowed to delete a user’s post.
Database security
Barring exception circumstances, the database must not be internet accessible. That is, the database must be configured to only allow connections from the backend service. There are various ways to do this, such as:
- Private network with the backend service
- Only allow requests from the backend service IP
- Only allow authenticated database users to query to the database (i.e. no anonymous user access). Then, give database user credentials to only the backend service.
- mTLS connection between the backend service and the database. This is a bit more advanced and I’m not sure if cloud-managed databases support this.
Ideally, you do all of these at the same time.
As I don’t know the intricacies of Firebase, perhaps Firebase automatically takes care of all of this under the hood when you start writing to storage via Firebase.
By ensuring that the database is only accessible via the backend service, we secure the data such that there are only two possibilities of data compromise:
- The cloud service itself has a vulnerability that allows attackers to access the database directly, even with the database completely locked down as above. This is incredibly unlikely.
- The backend logic has a security flaw that allows unauthenticated/unauthorized users to access data through the backend that they are not supposed to access. Preventing this comes down to programmer diligence when implementing the backend.
Thus, we shift the burden of security entirely onto the backend implementation, which we discuss below.
Authentication
There are a number of ways to do modern authentication. We discuss 2.5 major methods.
The below content is for conceptual learning purposes. Modern frameworks, middleware, and cloud services will automate a lot of this process for you. Firebase likely takes care of most of it for you.
You should avoid implementing home-grown security as much as possible. It’s easy to mess up.
For a summary of the below:
[YouTube] Session vs Token Authentication in 100 Seconds - Fireship
Session cookie
- The client initially logs in via POSTing their login info to a backend API endpoint such as
/login. - The backend receives the login credentials on
/loginand validates the credentials. - The backend generates a unique session ID and sends it back to the user.
- The client stores the unique session ID in a browser cookie (session cookie).
- On every request to the backend, the client (browser) automatically sends the session cookie to the backend.
- The backend receives the session cookie and validates that it matches the session ID it generated in steps 2,3.
- The backend returns the requested content to the logged in client.
For a real life analogue: I get a plane ticket. I am allowed on the plane when they scan my ticket because my ticket ID matches the ticket ID that the airline stored.
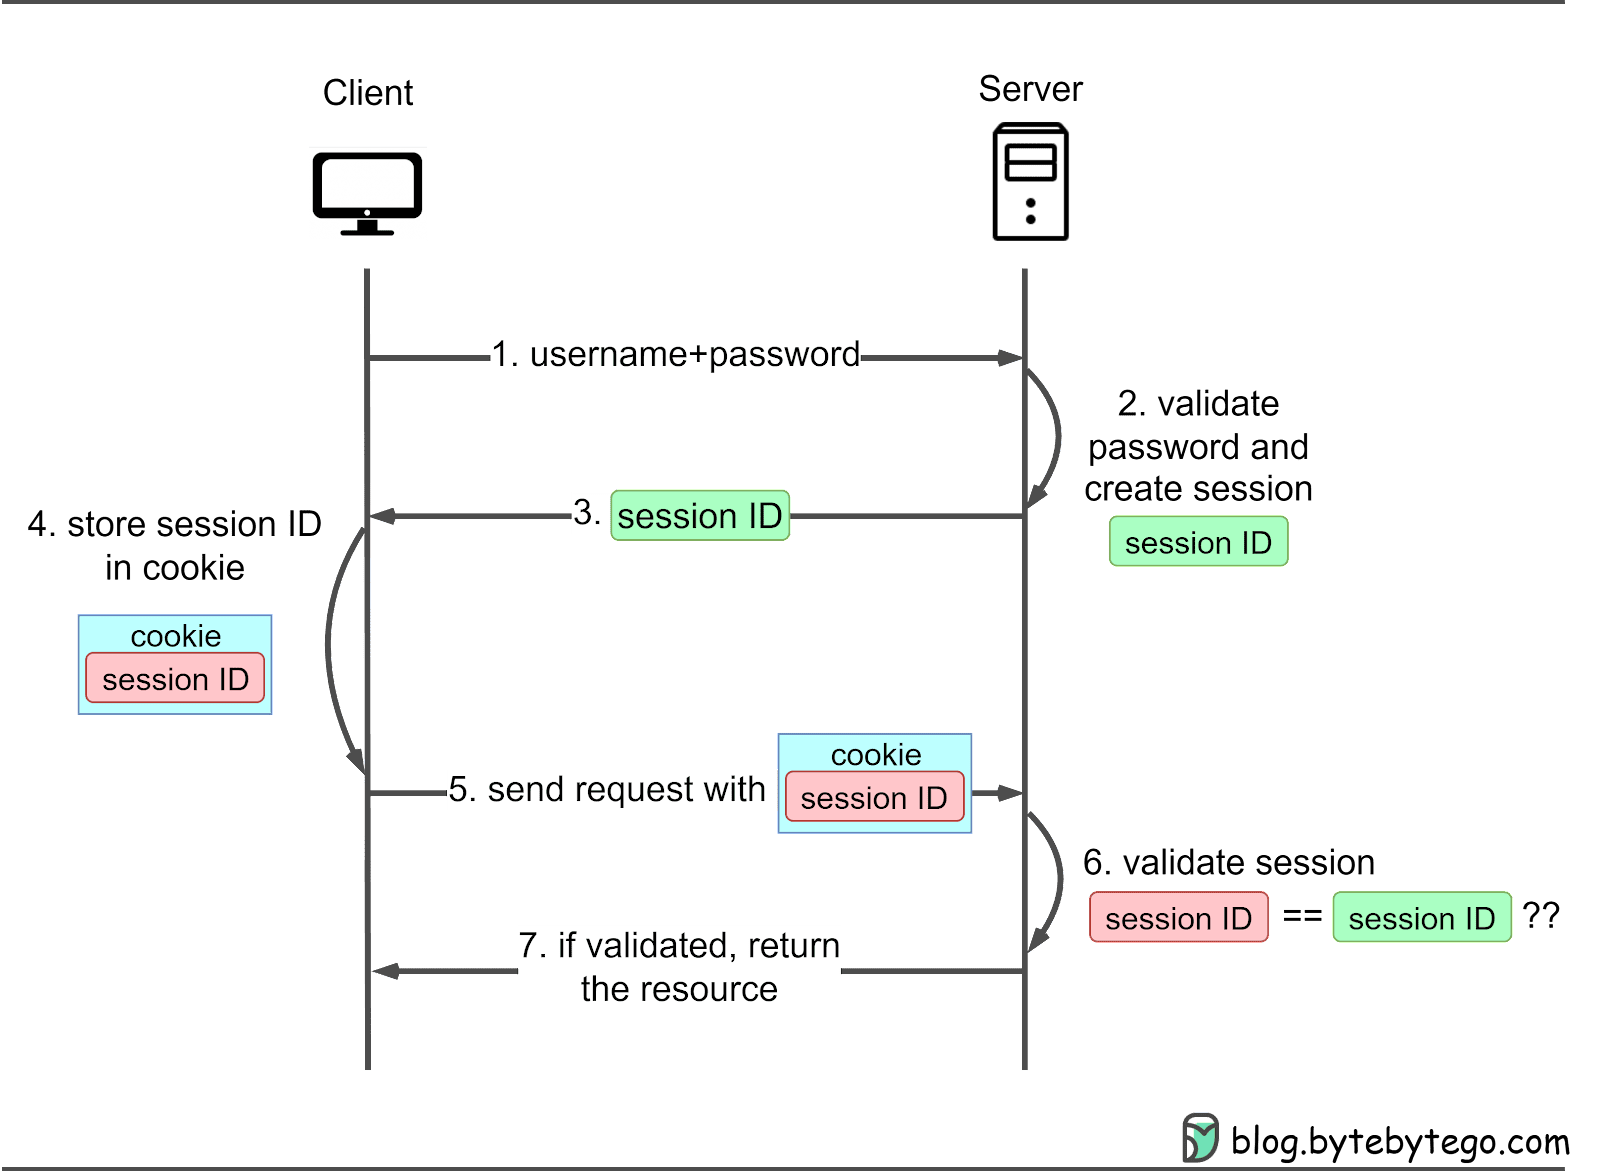
(from https://blog.bytebytego.com/p/password-session-cookie-token-jwt)
This is intuitive and people have been using this method for decades.
One major consequence of the session cookie design is server-side session state. Since the backend generates a unique session ID per-user and validates it on every request, it must keep its own copies of every session ID to validate against. Handling server-side state is never trivial, although modern middleware does ease the burden significantly.
JSON Web Token (JWT)
Note that this often requires asymmetric cryptography[Wikipedia], and is hence less inuitive than session cookies. Cryptography is outside the scope of this document.
- The client initially logs in via POSTing their login info to a backend API endpoint such as
/login. - The backend validates the credentials and generates an unsigned JSON Web Token (JWT). It then signs the JWT with its secret key. The JWT is now complete.
- The backend returns the complete JWT to the client.
- The client stores the JWT and sends it in the
AuthorizationHTTP header in every request. - The backend receives the JWT and validates the signature with its secret key. Since only the server has the secret key, the data inside the JWT cannot be forged/modified.
- The backend returns the requested content to the logged in client.
The JWT is structured as follows:
<header>.<payload>.<signature>
- Header: Metadata about the JWT
- Payload: All the data needed for validation. This typically includes the username and any authorized groups the user belongs to (e.g.
admin). - Signature: Signature from the backend signing the payload with its secret key. The backend uses this to validate the payload is legitimate.
For a real life analogue: I deliver a signed and stamped letter from a king. Despite never seeing the letter before, the receiver of the letter trusts the contents of the letter because they can verify the signature and the stamp from the king.

(from https://www.suketa.in/post/jwt/)
One major consequence of the JWT design is the lack of server-side state. Since the JWT is signed by the server, the server does not need to keep its own copy of the JWT. The backend simply validates all JWTs sent by all clients with its one secret key. However, since JWTs are always valid as long as they pass the signature validation, it is non-trivial to invalidate any single JWT.
SSO (OIDC, SAML)
This is beyond the scope of this document. However, these typically combine JWTs with an external issuer (e.g. Google login) to authenticate the user. This is often more secure than implementing all the authentication on your own.
Authorization
After authentication, the web application must determine whether or not the user is allowed to execute their request. For example:
Example 1
adminlogs in and gets a session IDadminsends a request along with its session cookie to/deleteto deleteuser2- The backend authenticates
adminwith its session ID - The backend checks if
adminhas permissions to call/delete - The backend confirms
adminis allowed to call/delete - The backend deletes
user2 - The backend returns a success code to the client
Example 2
user1logs in and gets a session IDuser1sends a request along with its session cookie to/deleteto deleteuser2- The backend authenticates
user1with its session ID - The backend checks if
user1has permissions to call/delete - The backend discovers
user1is not allowed to call/delete - The backend refuses to perform any action
- The backend returns an error code to the client
In both cases, the users passed the authentication step (i.e. they had valid session IDs and the backend successfully authenticated them). However, after authentication,
only admin was able to delete user2 because admin passed the authorization step to confirm it’s allowed to delete users. user1 on the other hand, failed
authorization and thus the backend did not delete user2.
An auth example
Consider the code for deleteRequest(id) from the basic CRUD API post further up in the post. Let’s add some authentication and authorization.
def deleteRequest(id):
    req_args = request.view_args
    print('req_args: ', req_args)
    bks = [b.serialize() for b in db.view()]
    if req_args:
        for b in bks:
            if b['id'] == int(req_args['id']):
                db.delete(b['id'])
                updated_bks = [b.serialize() for b in db.view()]
                print('updated_bks: ', updated_bks)
                return jsonify({
                    'res': updated_bks,
                    'status': '200',
                    'msg': 'Success deleting book by ID!👍😀',
                    'no_of_books': len(updated_bks)
                })
    else:
        return jsonify({
            'error': f"Error ⛔❌! No Book ID sent!",
            'res': '',
            'status': '404'
        })
For authorization, we are particularly interested in:
[...]
db.delete(b['id'])
[...]
Before calling delete, we must first authenticate and authorize the user. In pseudocode, this may look like:
# Authenticate the user
if client.getSessionCookieID() == sessionID:
    # Determine if user is authorized to delete objects
    if isUserAllowedToDelete(client.getUser()):
        db.delete(b['id'])
    else:
        return "Error: Unauthorized"
else:
    return "Error: Unauthenticated"
While you don’t need to implement a full stateful session storage solution or a full JWT solution, I recommend modifying the example code to take in hardcoded auth values to practice authentication/authorization concepts.
For example, if the user were to send a request to delete, with the query parameter[GeeksForGeeks]
user=real, they are authenticated. Otherwise, they are denied authentication.
Similarly, if the user were to send a request to delete, with the query parameter delete=authorized, they are authorized to delete the book. Otherwise, they are denied.